It was Pi day this week, and what better way to celebrate than to build a cluster of Pis? (No, I didn’t compute π with it)
But, to celebrate, I built my very own Raspberry Pi cluster.
It has eight Pi 3s, all connected to each other via 100mbps ethernet. Each one is about 1/8th as powerful as my laptop, so combined they’re about as powerful as my laptop, which is considerable - I’ve long thought of Raspberry Pis as being closer to a Teensy that can run Linux than a computer with GPIO ports. My other Pi is a Pi B, and the Pi 3 is an entirely different animal.
It’s vastly more powerful, is 64-bit, has multiple cores and enough memory to do substantial operations. But this comes at the cost of heat. My old Pi B never even got warm to the touch, but benchmarking my Pi 3 shows that, without a heatsink, when all 4 cores are running full tilt the temperature goes up to around 82 degrees Celsius and the frequency is throttled back to around 850MHz (down from 1.2GHz - about a 30% drop). Heatsinks are a must for the Pi 3.
Physical Assembly
As for assembling them, I decided I didn’t want to do anything too fancy. It’s just a bunch of Pis connected to power and Ethernet. Annoyingly, there are no 9 port ethernet switches. I had to get a 16 port switch to plug in 8 Pis and connect it to my controller machine.
I designed a 3D-printable mount for all of the Pis, but I ran out of green filament before I could print all of the parts. So, I bought some red filament, and while that shipped I just laid all of the parts out behind my laptop:

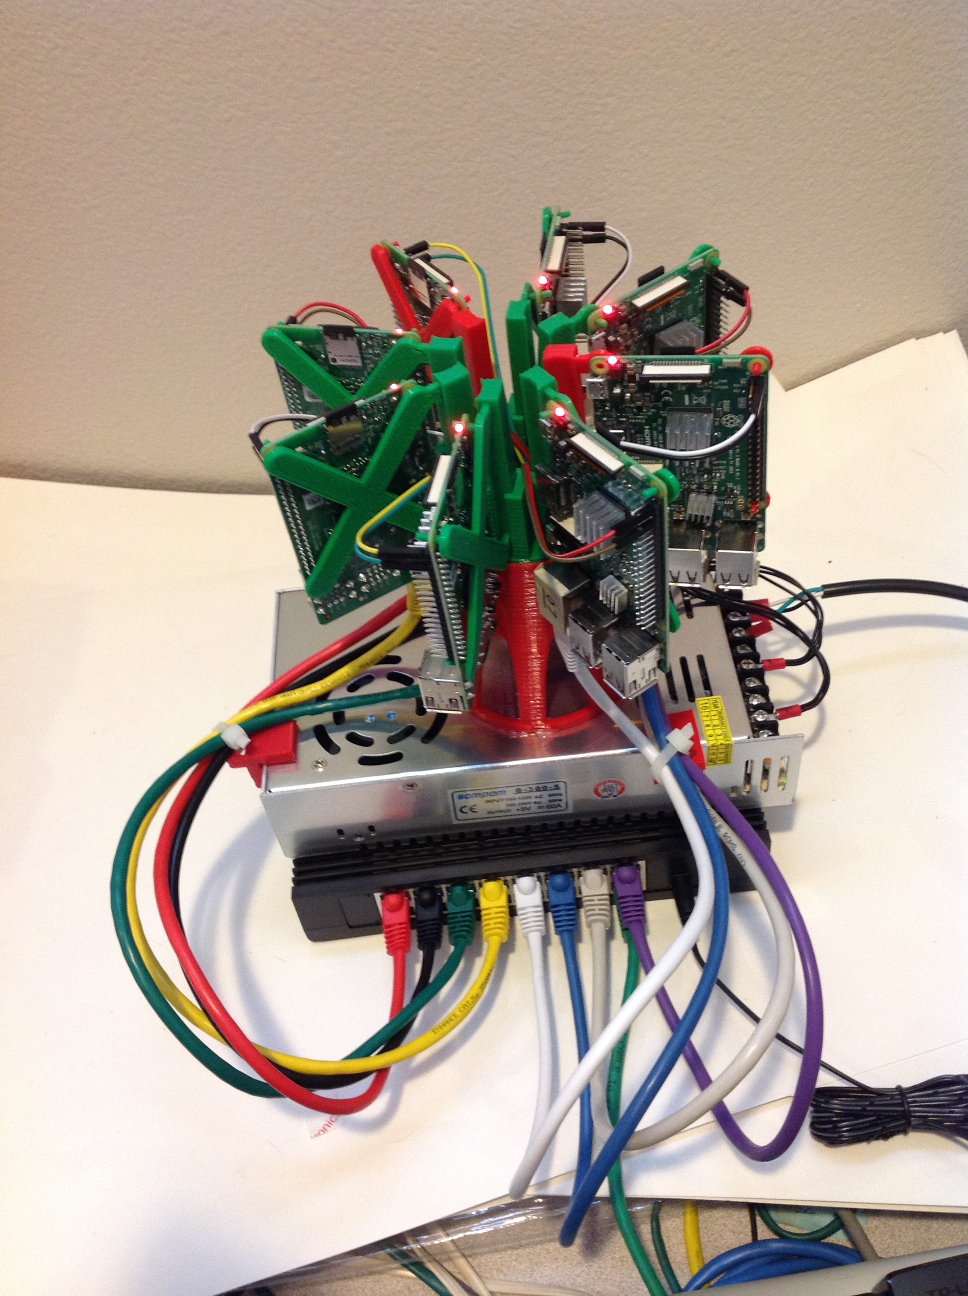
Eventually the new red filament came in, and I printed the remaining parts, and assembled the coolest SciFi movie prop:

Thermal Properties
Heatsinks are so required, in fact, that one of the Pis was randomly segfaulting programs when the temperature was above 80 degrees and all cores were running full tilt. It’s not 100% reproducible, but installing the heatsinks seems to have removed the problem.
Getting a heatsink (with the Pis on a flat surface with no forced airflow - the first setup above) did reduce the thermal load a decent amount, but not enough to bring the temperature below 80 degrees under full load. However, the amount of CPU throttling was greatly reduced, as now the throttled CPU frequency averaged around 1.12GHz, as compared to the 850MHz without the heatsinks.
For reference, the command I used to measure the temperatures and clock frequencies were:
vcgencmd measure_temp
vcgencmd measure_clock arm
To monitor the temperature of the entire cluster, I used the watch command to have ansible collect the cluster’s temperatures every 20 seconds:
$ ansible rpic -a "vcgencmd measure_temp" | tr "\n" " " | gawk "{ print }" | tee -a temps
And then I parsed the resulting file (“temps”) with a short Python script:
import sys
import re

def consumeLine(line):
        parts = line.strip(" \r\n").split(" ")
        temps = [0.0]*8
        for i in range(8):
                host = parts[i*7]
                ts = parts[i*7+6]
                m = re.search(r'\d\d\.\d', ts)
                t = m.group(0)
                m = re.search(r'\d\d', host)
                host = int(m.group(0))
                temps[host] = t
        print(",".join(temps))

for line in sys.stdin.readlines():
        if len(line) == 0:
                continue
        try:
                consumeLine(line)
        except:
                continue
I ran this while running the “stress” command on all of the Pis, and obtained this graph:
 The sudden ramp up is when I started running stress, and the ramp down is when I stopped. As you can see the exponential increase ends right at 80 degrees, and some Pis don’t even make it all the way up to 80 (rpi01 appears to be a full 2-3 degrees cooler than the rest).
Once I assembled the vertical tower, the temperature dropped substantially. Interestingly, because of how the tower is located on top of the power supply, some of the Pis are getting forced airflow as a result of the power supply’s fan. The way I have it setup, the Pis are (from above) numbered increasing counter-clockwise, and rpi05 is directly over the fan (so rpi00 is directly opposite).
Here’s a graph (courtesy of amCharts) of the peak temperatures as a function of the Pis location in the cluster:

The fan is to the bottom.
Rarely do we see anything so clear-cut. There’s a 20 degree Celsius difference between the fan side (around 60 degrees) and the side away from the fan (around 80 degrees).
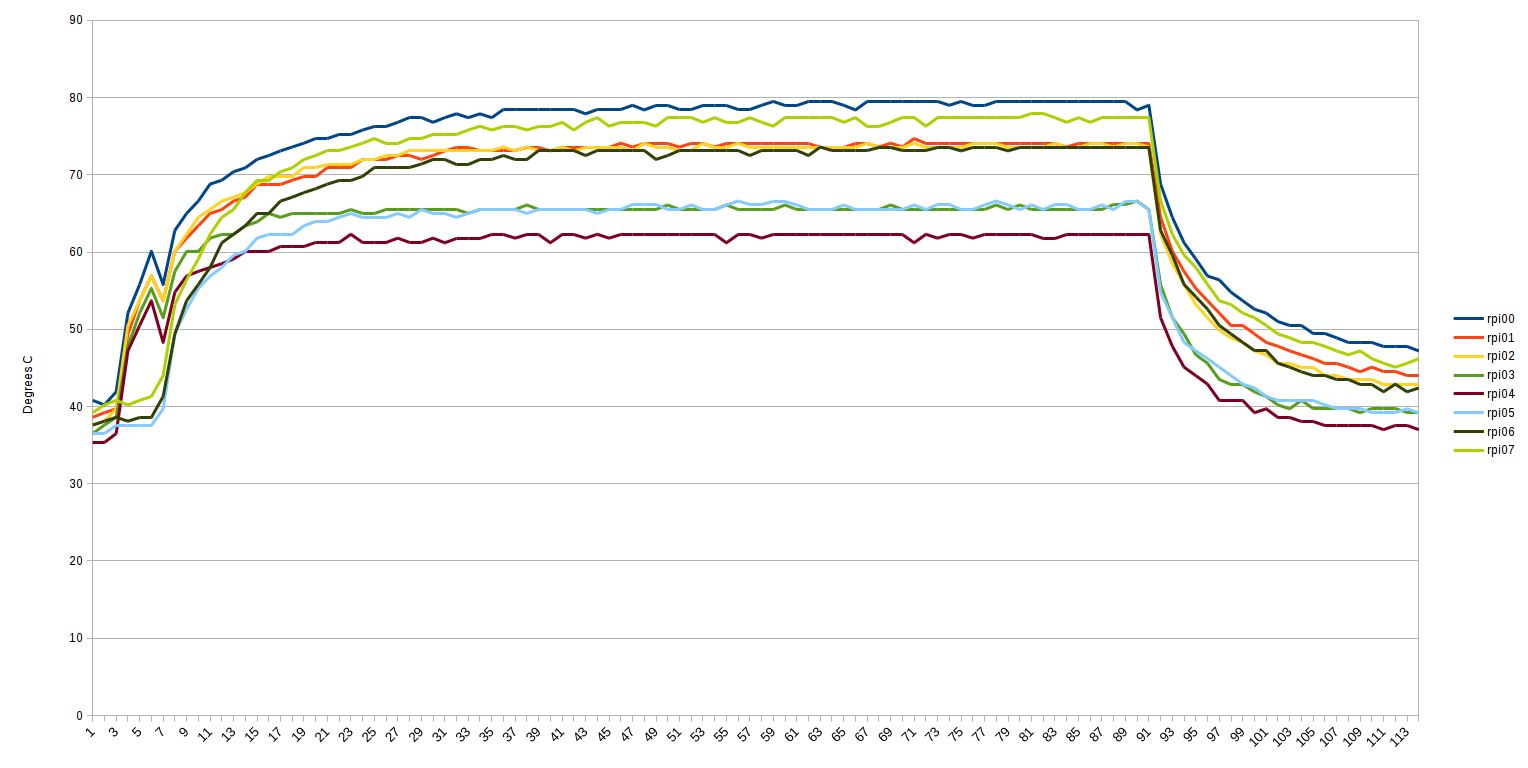
If we graph the temperature as a function of time, we get:

As you can see, this is both more spread (because of the fan on one side) and cooler (even rpi00 is staying below 80 degrees). Success - the Pis are all cool enough to evade CPU scaling!
Cluster Architecture and Wiring
As part of making the cluster as simple as possible, all of the nodes are interchangeable and the C&C happens from my server. That way none of them are a point of failure, and if one of them gets confused I can just wipe its SD card without having to care whether it was a head node or not (My server has RAID and backups, so I’m less worried about it failing).
To save on costs, for power I bought a 5V desktop power supply (you can get them on Amazon for $30 at $0.10/Watt). Mine puts out 60A at 5V, so even if the Pi 3 pulls 2A (the max. rated, with USB ports) I can support 30 of them. The only thing to be careful of is the wiring - if you just buy 8 USB chargers, you can be sure that you won’t mess up plugging them in, but you’ll spend twice as much. But I managed to do it fine. Here’s a picture of my Power Distribution Board:

Yes, it is just a double-row 0.1” header with positive soldered to one side and ground soldered to the other. Each Pi has two 0.1” female-female cables which connect the Pi to the PDB. (the PDB sources 20A - a bit over 2A for each Pi - so I had to use 3 22-gauge wires to connect each of the positive and ground rails to the power supply) It doesn’t even get warm during operation - a testament to how much current solder bridges can carry.
I did cover it masking tape while I was building the case, to prevent it from shorting against anything. So that’s OSHA compliant, right?
The Pis are all setup identically, named rpi00 through rpi07 (rpi00 is actually special in some ways). They’re all running headless Raspbian, setup with the ease of the assembly-line (unpack the SD card and Pi, flash the SD card, boot the SD card and Pi, configure the SD card/Pi combo - repeat 7 times).
I bought rpi00 separately from the others, so I could try out the Pi 3 without making a huge investment. As such, it’s the only one that’s made in the People’s Republic of China, whereas the other seven are all made in the United Kingdom. Interestingly, it also appears that it runs the warmest, but I don’t have enough solid data to be sure.
As far as administration is concerned, I’m using Ansible to control all of the Pis. It’s turned out to be quite easy to use. So far I’ve largely just used it to install packages across the cluster and measure temperatures across the cluster, but for these things it’s proved its worth already.
So far my use case is largely batch data processing - I don’t have very many applications that I need to host (I don’t run a Minecraft server anymore), and the ones that I do host are already setup in their own fragile ways. There’s a lot of tools out there to host applications, along the lines of Kubernetes and Docker, but I couldn’t find very many tools for doing batch processing (apart from tools designed for hundred- to thousand-node clusters, or which have the overhead of running a daemon on the work machines). Perhaps that’s just an artifact of the circles I move in, but it’s spurred me to start developing a small, easy-to-configure (as easy as Ansible, is my goal) batch processing scheduler that uses SSH to run jobs.
So as not to break my streak of Star Wars-related posts, I’m calling it red-leader for now - I’ll release it once it’s more mature.
